Obsessed with Embellishment

Wednesday, November 15, 2006

Why I Luv "Dancing With The Stars"


First off - Emmitt had a MUCH better posse - Roger Staubach, Troy Aikman - and who did Mario have? George Lopez. His Mom. Need I say more?

True, the are-they-or-are-they-not-dating back story was really compelling, but folks - they ARE dating - because we saw Mario's Mom show up at a rehearsal, and Karina bestowed upon her that respectful peck-on-the-cheek required by the pack's Alpha Female. Trust me, if Mrs. Lopez took that air kiss from Karina - she's dating her son.

And Emmit, to his credit, won this thing because he used his NFL training to full advantage - not only did he win the World's Ugliest Trophy, but now he gets to call up Jerry Rice tomorrow morning and say "Pay UP, Brother!" ( I didn't think it was possible to for any trophy to be uglier than the Stanley Cup, or *gack* the Indy 500 Trophy, whose minature bas-relief heads of the previous winners scare the daylights out of me. )

But it was, in short - a totally satisfying 16 weeks of reality TV. The real winner? Cheryl - two years in a row now. Time to renegotiate that contract baby!

Sunday, November 12, 2006

Rock Lobster !


If I could have music on my blog, you'd now be listening to "Rock Lobster" by the B-52's! I just love this jacket by John Galliano from the Dior Fall 2006 couture collection.

I like it because it really does look like a lobster. I live in New England and I've been eating them all my life. I know lobster anatomy!

And the lobster tail hat! ! It's very Surrealist, and very Elsa Schiaparelli. I have only one complaint - it's not 3-D, as you can see from the runway shot. But when I win the lottery I will have Dior make mine a true hat.

So the big question is - what can we learn from this thing? First off - the beading is really witty and wonderful, and there are lots of ideas to steal. Pearls, of course, are perfect for a garment with an ocean theme, and the mix of different size pearls (ivory and colored), crystals (marquis and round) adds a lots of interest while keeping the embellishment toned down just enough. I also like the little paisleys and curlicues beaded down the center front of the jacket and along the edges of the lobster shell. Zoom into the jacket on the larger photo and notice how the different sizes of beads, pearls and crystals are combined along the edges. The feathery edges themsleves look like bird feathers.

My guess is that all of this embellishment was added after the garment was sewn. There must be a backing underneath the fashion fabric because this embellishment is likely on the heavy side.

I'm sure some people think this garment looks like a costume from a Disney On Ice production of the The LIttle Mermaid, but you just can't deny this is something really spectacular. Sure - it's waaaay over top, and is probabley a perfect example of what most peope think is wrong with modern couture, but I think the embellishment is magnificent!

Friday, November 03, 2006

Embellish Without Fear - Part II, Machine Embroidery


I've noticed recently there's been a backlash against machine embroidery and I can understand why. The start up costs are high for both a machine and materials, and once they get into it, sewers seem to be quickly get stuck in a design rut.

At the moment, there are hundreds of thousands of designs out there. A site like Embrodiery.com has more than I can even imagine. So how do you decide which one to use? I have a simple rule:

Embellishment Rule 2: Avoid the "Motif" look

You've all seen these - a design embroidered smack in the middle of a sweatshirt. The design is totally self contained, it stands alone, and it often can't be manipulated or varied in even a simple way (flipped, rotated, repeated, mirror image)

However, the delightful baby sweater dress above (from the winter 2006 Hanna Anderson catalog) perfectly sums up a great machine embroidery design used creatively.

For example, If you used this design instead:


You would loose some impact in the final garment. This design is from Anita Goodesign, and while it's a really nice holiday motif, it's more suited to a non-garment project, such as dinner napkins or a table runner. If you tried to use on this on baby dress like the one above there's not much you can do with it other than to flip it as a mirror image, and as such it's not really meant to be used for a garment.

The Hanna baby sweater dress works for other reasons as well; the garment design is great to begin with, the color palette is narrow but effective, (there are only three colors; cream, dark red, and green), the cables on the sweater knit are the right scale to the embroidery, and the asymetrical embroidery is a prefect counterweight to the regularity of the cables.

You could make you own version of this dress pretty easily for a little one. The design shown at left is from Cactus Punch and it has a similar line and look to the design used on the Hanna dress. If you're not a skilled hand or machine knitter (I'm neither), this dress could be sewn from sweater knit yardage, or Malden Mills shearling polar fleece.

Sunday, October 29, 2006

Tim Gunn Embellished


I was cleaning out my sewing room today, and found some doll house sewing acessories - so naturally Tim had to wear them.

He looks quite dapper, and rather bespoke, wouldn't you say?

Saturday, October 28, 2006

Embellish Without Fear - Part I

I love all types of embellishment - embroidery (hand and machine - yes I like machine embroidery), beading, lace, trim, ribbons, tassels, buttons - you name it. But I must be honest, when it comes to embellishment, I have pretty strong opinions about what works and what doesn't. For the most part 99.9% of what I see as embellishment and/or "art-to-wear" is absolute dreck, and with the exception of a few well-documented historical needlework forms, such as samplers and stumpwork, nothing makes me cringe more than kitschy hand embroidery framed and hung on a wall as Art with a capital "A".

For me, embellishment and needlework is meant for clothing and useful household objects. Coco Chanel once said that the garment always comes first, then the embellishment, and I agree.

So I'll show you how I approach embellishment from this perspective. Over the years, I've seen plenty of bad embellishment on sewing blogs and web sites, but I'll use two of my own projects as examples because we can can rip them to shreds and no feelings will be hurt. Both of these projects used exactly the same embellishment technique, and virtually the same color palette, beads and materials, but I think you'll agree that one works, and one doesn't. Here's why:

Rule 1: The Pattern Comes First

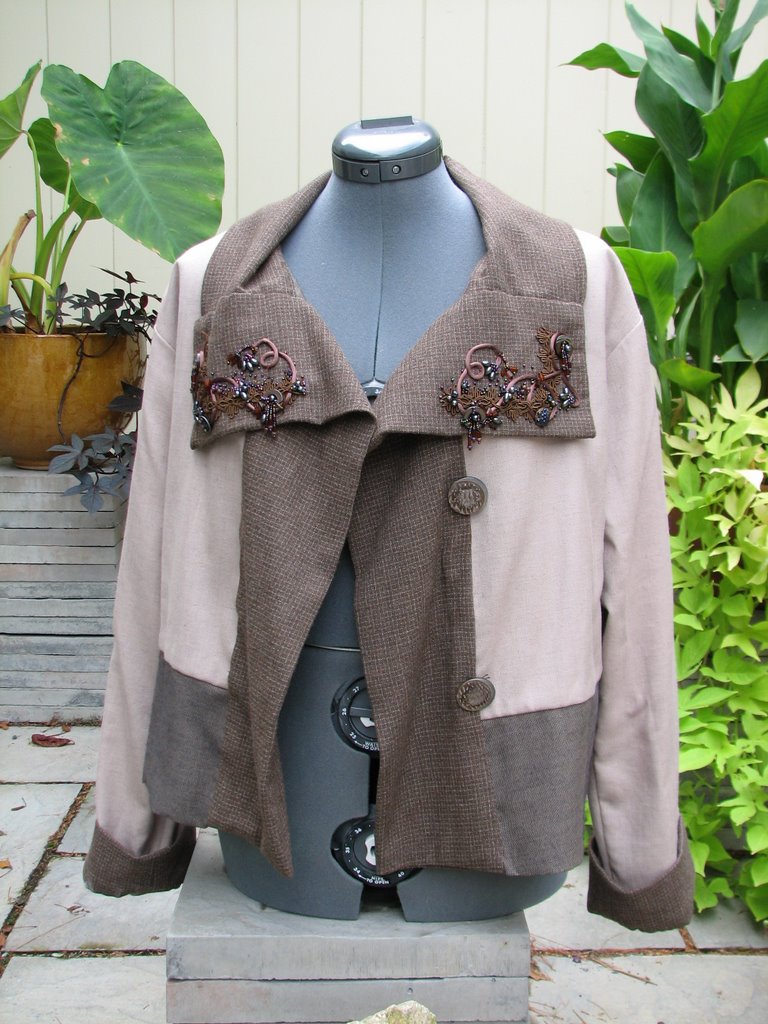
Plopping an embellishment technique onto a project, that is, just using the garment as a blank canvas, really never works, and that's the main problem with this jacket:


This is a Kenneth King technique that had I wanted to try for quite some time, and I actually made that decision prior to deciding what pattern to use. Big mistake. Consequently, this Marcy Tilton pattern (Vogue 7907) is totally unsuitable because I discovered the beading is so heavy that it weighs more than the very unstructured jacket, and the quasi-Asian design of the style has no relationship to the organic, elaborate beading. The overall effect? Weird.


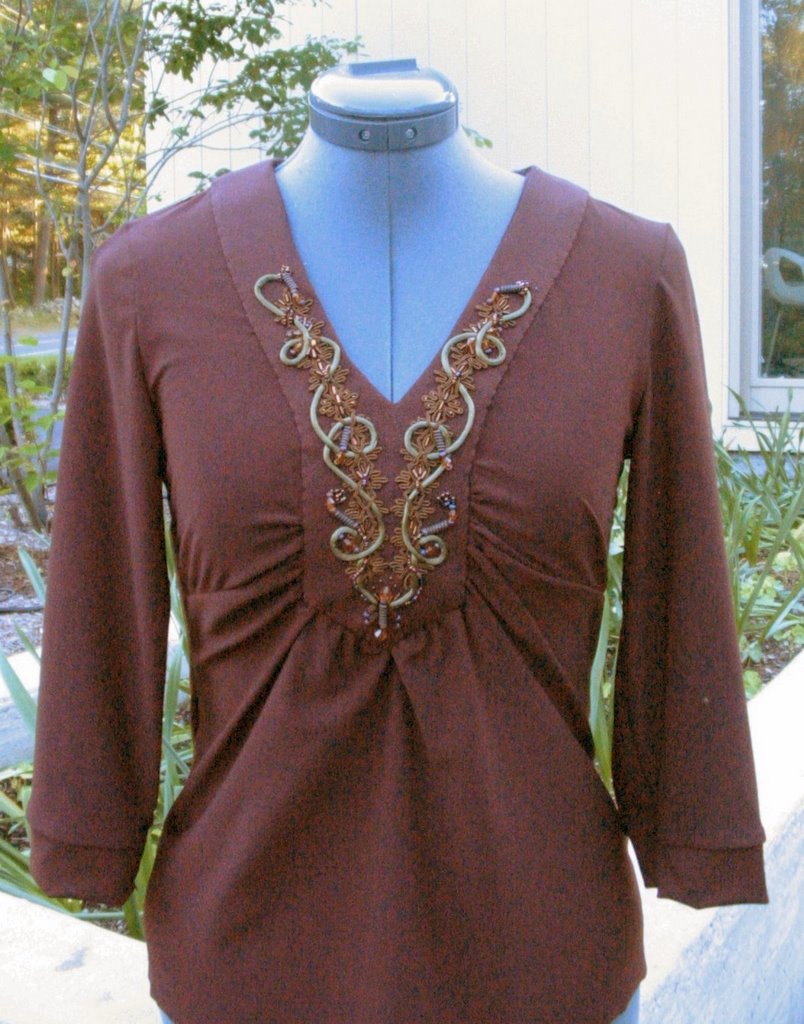
However, on the second attempt at this technique, I used a pattern that, by design, has a built in "canvas" - a front placket. This is Simplicity 4142 and even though the knit I used is very lightweight, the centered aspect of the placket could still accept the heavy wool felt backing needed for all of this beading and rattail cord.


Also, from a design perspective, this embellishment makes sense because the design of the pattern provides a proper showcase for the technique. This is exactly the problem with the beading on the lapels of the Vogue jacket - the embellishment just sits there, on it's own, and it has no design relationship to any feature of the jacket, even though the color palette is in the correct range.

So the lesson here is to really look at your intended embellishment, and see if it relates in a logical way to the rest of the garment, as opposed to just "sitting there." I posted a tutorial on the making of this placket a while back, and you go here for Part I, and here for Part II.

In a future post I'll cover machine embroidery designs, which have been getting a bad rap lately, and I'll share with you how I evaluate a design before I use it.

Sunday, October 22, 2006

Beaded Tassel Tutorial

I first made these as a fastening for a
Chanel-like cardigan. These tassels are not hard to make, although the work is a little fussy, but if you like making jewelry you'll probably enjoy this.

The finished tassel is about 2 3/4 inches long, and the top loop is 2 inches (50 beads for mine.) If you plan to use the tassel for earrings, or to embellish a zipper on a handbag, then you can adjust the length of the loop accordingly.


Materials List

  1. Nymo beading thread, fine. Use black Nymo for opaque beads, white for crystal & clear beads . Regular sewing thread is not strong enough for this type of beading.
  2. Beading needles (I used J & P Coats H.16, size 10/13)


Naturally, for the beads you can use whatever you like, but I'll give you the bead sizes I used as a guide:

One 10mm faceted bead for the tassel head
One 6mm disc-shaped bead for the neck

Each strand of the skirt contains:

16 seed beads of one color
2 seed beads of another color as a transition
1 bugle bead that coordinate with the 2 transition beads
1 4mm bicone bead
1 Czech E-bead (a bead the same shape as a seed bead, but larger)
1 dangle (usually side drilled) or teardrop bead (usually top drilled) for the end

Each tassel has 6 strands in the skirt. If you use a top drilled bead for the end of each skirt strand you will need an additional seed bead as a stopper.

Step 1:

Cut a piece of Nymo 5 feet long. Each tassel uses one continuous strand of thread, looped back and forth through the beads. It's really important to have more than enough thread to complete one tassel because if you run out of thread and try to tie onto a strand to complete the skirt, you will compromise the strength of the finished tassel.

The first step works from the bottom up and you'll create one skirt strand, and then continue with the neck bead, the head bead, and the top loop. String your dangle or tear drop with a single strand of Nymo, then double the strand, re-thread the needle, and string the skirt strand beads on the doubled thread. Add the neck bead, head bead, and the beads for the loop. When the loop islong enough, create the loop and bring the thread back down through the head bead and the neck bead.

It should look like this:


You now have one skirt strand and the top parts of the tassel are formed. Unthread the needle. You will now use each of the two separate threads to create the rest of the skirt strands.

Step 2:

This is an important step to understand: from this point onwards, you will string each skirt strand from the top down to the dangle (the original skirt strand was done bottom up in order make the neck, head and loop of the tassel)

Thread the needle and string on that single strand: 16 seed beads, 2 transition beads, the bugle bead, the bicone, the Czech e-bead, and the dangle or teardrop. After you attach the dangle or teardrop (with teardrops you will need to use a single seed bead below it as a stopper) thread through the entire strand again from the bottom up, catching every bead:


When you get to the neck and head beads, run the thread through those as well, snug the strand to the neck bead, and bring the needle out at the top of the head bead. Wrap the beading thread around the bottom of the loop where the last two loop beads touch the head bead, and bring the thread back down the thorough the head and neck beeads.

Unthread the needle, and separate the two strands of thread. Rethread the needle again as a single strand an continue as before, making another strand of the skirt. After you use up one piece of thread, go to the other piece and finish the skirt. You should be able to do 3 skirt strands on one piece of thread, and 3 on the other.


Step 3:

After all six skirt strands are complete, go through and wrap around the head bead one last time, but bring the needle out between the head bead and the neck bead. Run the needle horizontally through the many strands of thread, make a loop, and pull a tight knot. Then run the thread down thought the neck bead and through at least 6 beads in a skirt strand, and cut off the thread. This last step, of running the end piece of thread through a skirt strand, is actually very important because it prevents the knot from coming undone.


You're done!

Friday, October 20, 2006

This week on CNN.com I read with nostalgic regret that CBGB, the legendary NYC punk club, had finally closed after 33 years. I was in college during the late 70's and fully participated in that music scene, and it was one of the most exciting times of my life. Great times, great bands, and I feel lucky to have been able to be part of a true scene. If you were on PatternReview.com from 2002 to 2004 it was the same type of thing; that special feeling of being really hip and happening and watching the rest of the world catch up.

However - I have to make a public comment to John Wands of Verona, NJ. John posted on the CNN story that his fondest CBGB memory was the night the Sex Pistols played there, and Sid Vicious spat on him from the stage. I must say to you, John Wands of Verona NJ - IT NEVER HAPPENED. The Pistols never played NYC, they never even got close. On their single US tour Malcolm McLaren, their manager, booked them into redneck bars in Austin and Atlanta, and then they played one gig in San Francisco and broke up. Sid Vicious moved to NYC and lived at the Chelsea Hotel with his American girlfriend Nancy Spungen.

I do believe that John Wands of Verona NJ did indeed see Sid play a solo gig in NYC, and I'm sure Sid (or much more likely, Nancy) spat on him too, but it was at Max's Kansas City and not CBGB.

I'm not dissing John Wands of Verona NJ - everyone partied a lot in those days, and maybe his memory is just a bit hazy. I just want to set the record straight, and the info above was verified with friends of mine who worked in radio at the time. So trust me on this one:

The Sex Pistols NEVER played a gig at CBGB !